
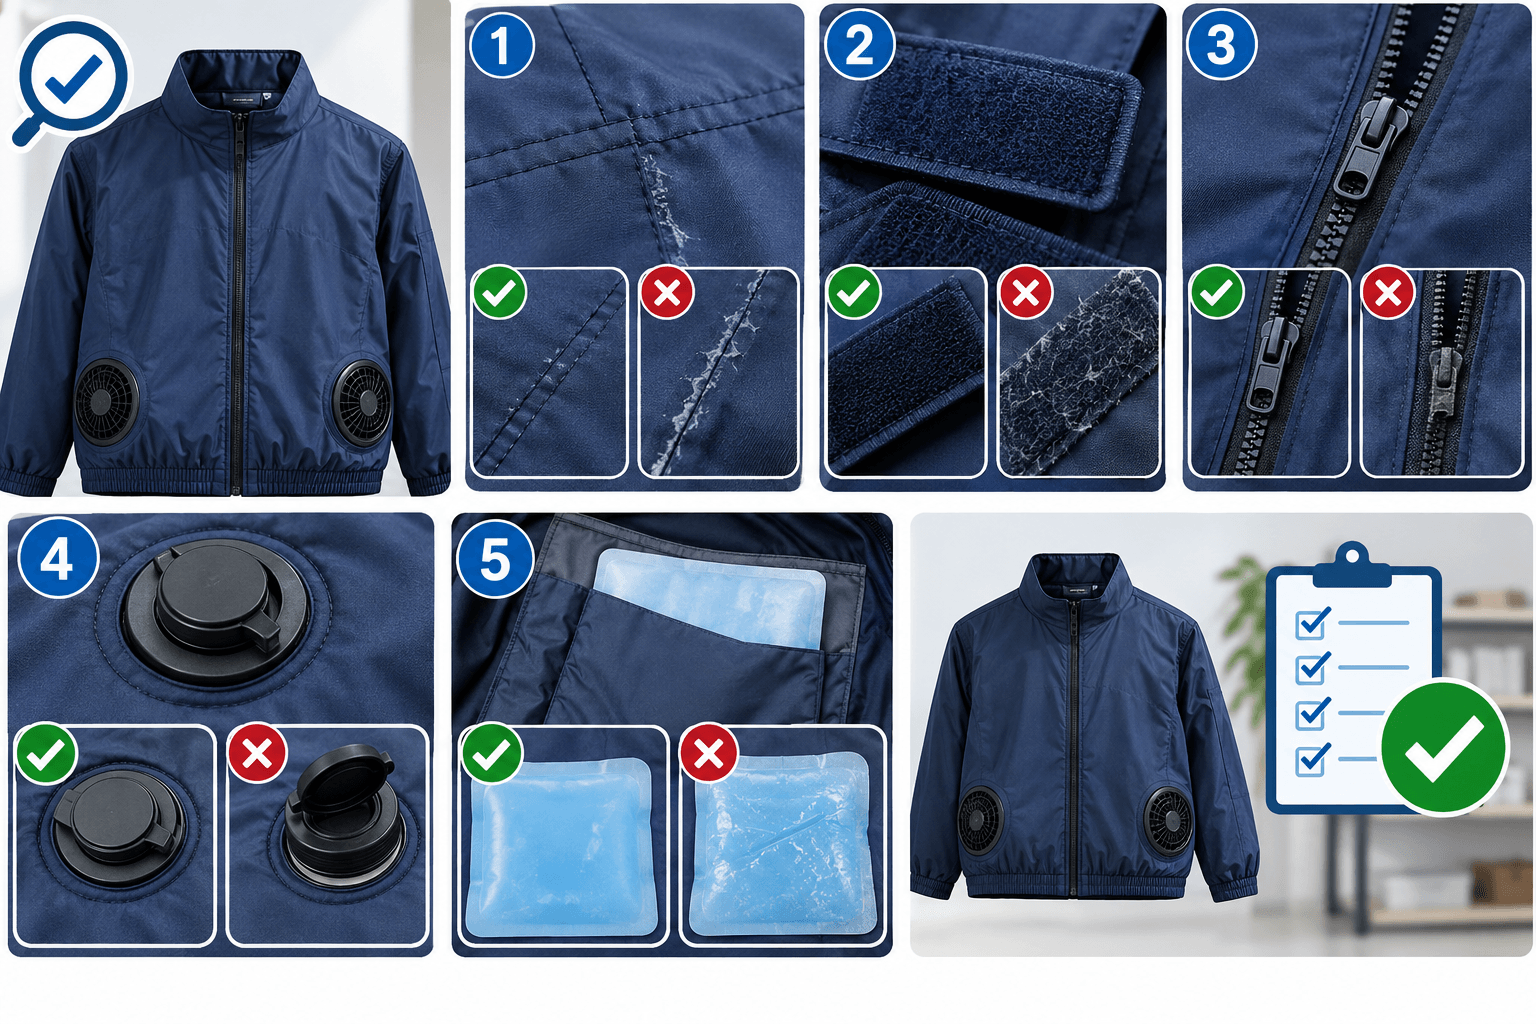
Toss your cooling fan vest in the washing machine, and you’re one cycle away from frying the battery pack or jamming the fan motor. That $150 investment deserves better than guesswork—yet most brands bury the actual cleaning instructions in fine print nobody reads until something breaks.
Cleaning a cooling fan vest isn’t complicated once you know the sequence, but it requires a different approach than your average t-shirt because you’re dealing with electronics stitched into fabric.
This guide walks through the exact battery cooling vest maintenance routine—from popping out the fan module before it touches water, to drying methods that won’t warp the vents or leave a musty smell behind.
Step 1: Prepare the Vest Before Cleaning
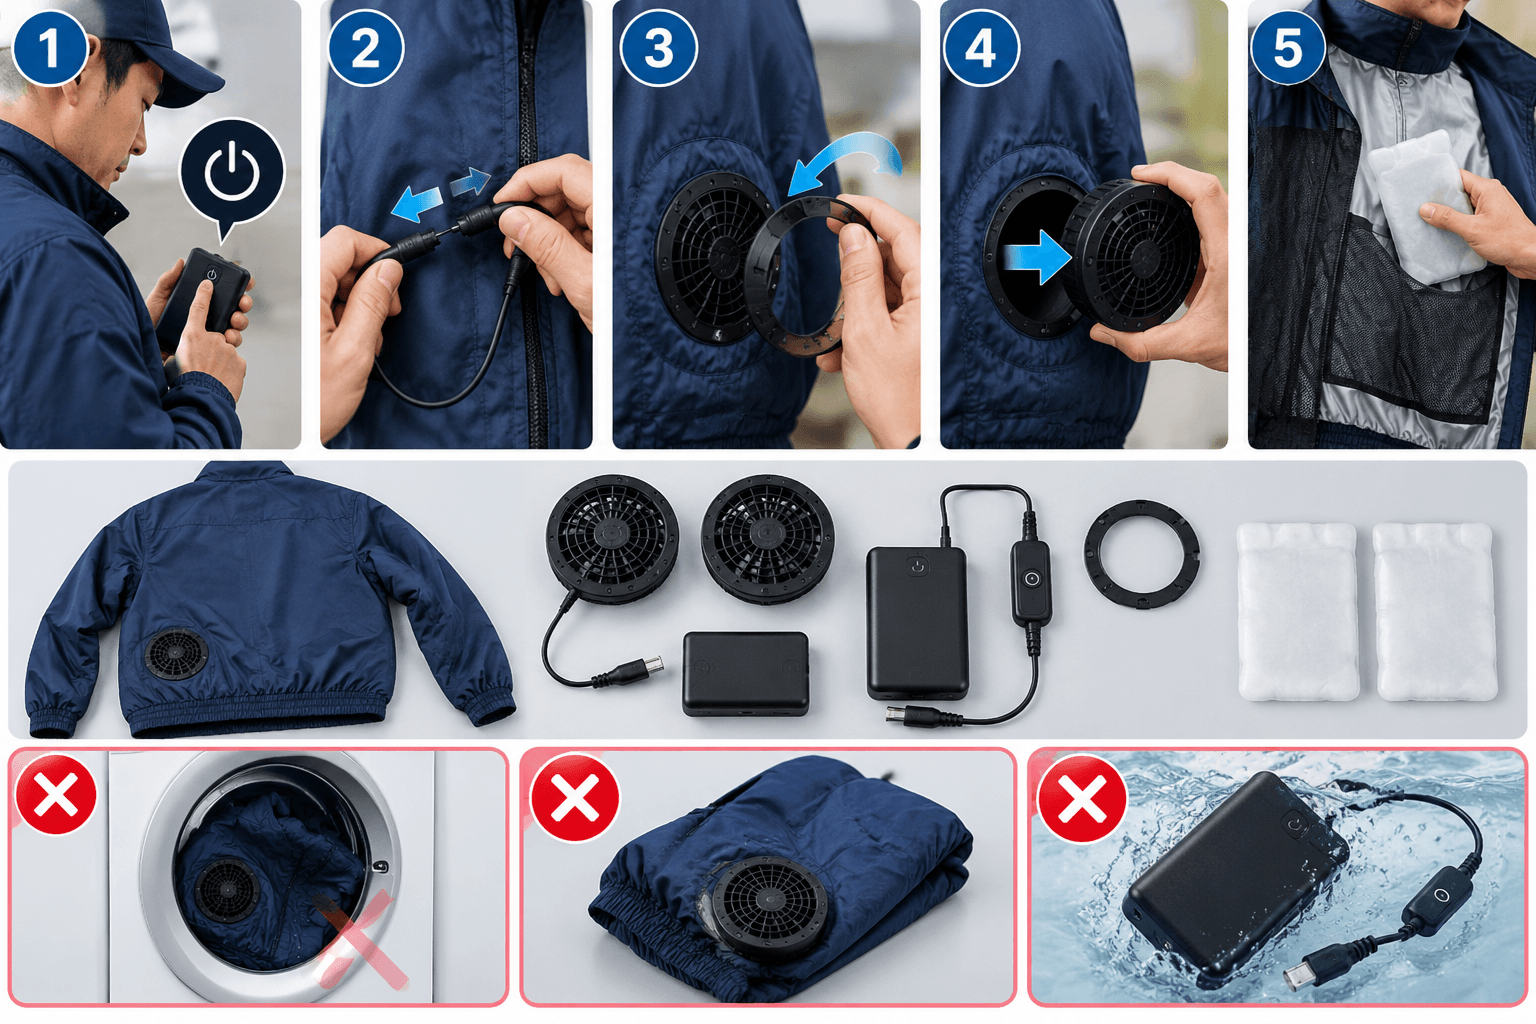
Every cooling fan vest disaster happens because someone skipped this step. Before any water touches the fabric, take out every electronic component.
Remove in this order:
1. Power off the unit
2. Unplug the battery pack and cables
3. Release the fan’s retaining ring or stopper
4. Pull the fan out from the vest’s exterior
5. Take out ice packs, PCM inserts, or gel cooling pads
Check pockets and cable channels for stray connectors first. Some models, like the AC08, also hide a water-stopper cap behind the fan that you need to remove before rinsing.
Skip this step, and you risk short circuits, fried batteries, or a fan that won’t spin next time you charge it.
Step 2: How to Clean the Fabric/Vest Surface
The fabric of a cooling fan vest might be tough, but the seams, mesh panels, and cable channels are not built for a full-power spin cycle. So don’t toss it in on “normal” like a gym shirt.
Hand Washing (The Safer Default)
Fill a basin with cool to lukewarm water. Stay under 30°C / 86°F. Hot water breaks down the fabric coating and warps the mesh vents over time.
Add a mild, pH-neutral detergent. Skip bleach, fabric softener, and heavy-duty soaps. These fabrics are technical, not cotton.
-
Submerge the vest fully.
-
Gently swirl it with your hands for 2-3 minutes.
-
Use a soft cloth for any stubborn sweat stains or grime spots.
-
Never rub, twist, or wring the fabric—this damages the seams and mesh panels.
-
Drain the soapy water, refill with clean water.
-
Rinse until the water runs completely clear.
That last step isn’t optional. Leftover detergent clogs the fabric’s breathability and can irritate your skin during your next sweaty shift.
Machine Washing (Check First, Wash Second)
Not every cooling vest survives a washing machine, so check the care label before you do anything. Look for a tub icon with one or two lines underneath. That’s your signal for a delicate or gentle cycle. No lines, no machine wash.
If your label gives the green light, place the vest inside a mesh laundry bag, select the delicate or gentle cycle, set water temperature to cold (usually ≤30°C), keep the load small (don’t wash it with jeans or towels), and choose low spin or skip the spin cycle entirely if your machine allows it.
Hand washing gives you more control and less risk than machine washing. When in doubt, wash by hand.
Step 3: Fan and Battery Care
Water and electronics don’t mix—that’s just physics. Get this step wrong and the fan module and battery pack will turn a $150 vest into an expensive brick.
Cleaning the Fan Module
Once you’ve pulled the fan out (from Step 1), never submerge it in water. Not even for a second.
-
Wipe the exterior housing with a dry or slightly damp cloth.
-
Use a soft brush, cotton swab, or compressed air to clear dust from the grille and intake vents.
-
Check the air pathway—clogged vents force the motor to work harder, which shortens its lifespan.
-
Let every part dry completely before reattaching it to the vest. Trapped moisture inside the housing can corrode connectors over time.
This five-minute routine is the difference between a fan that lasts years and one that needs replacing after a single season.
Battery Storage Rules
Lithium batteries have their own maintenance logic, separate from fabric care. Store at 40–60% charge if you’re not using the vest for a while. Full or empty storage degrades battery capacity faster. Keep it in a cool, dry spot—no direct sunlight, no freezing temps, no leaving it in a hot car. Avoid overcharging—unplug once it hits 100%. Check the battery every 3–6 months during storage and top off if it’s dropped too low.
When to Replace, Not Repair
Inspect the battery for swelling, leakage, cracks, or damaged connectors. Any of these means immediate replacement. Don’t try to nurse a compromised battery back to health.
For reference, most cooling fan vests run 6–8 hours per charge on low speed, dropping to 4–6 hours on dual-fan or high settings. Some premium models stretch to 4–11 hours depending on battery capacity. Consistent maintenance keeps you closer to the high end of that range.
Step 4: Proper Drying Techniques
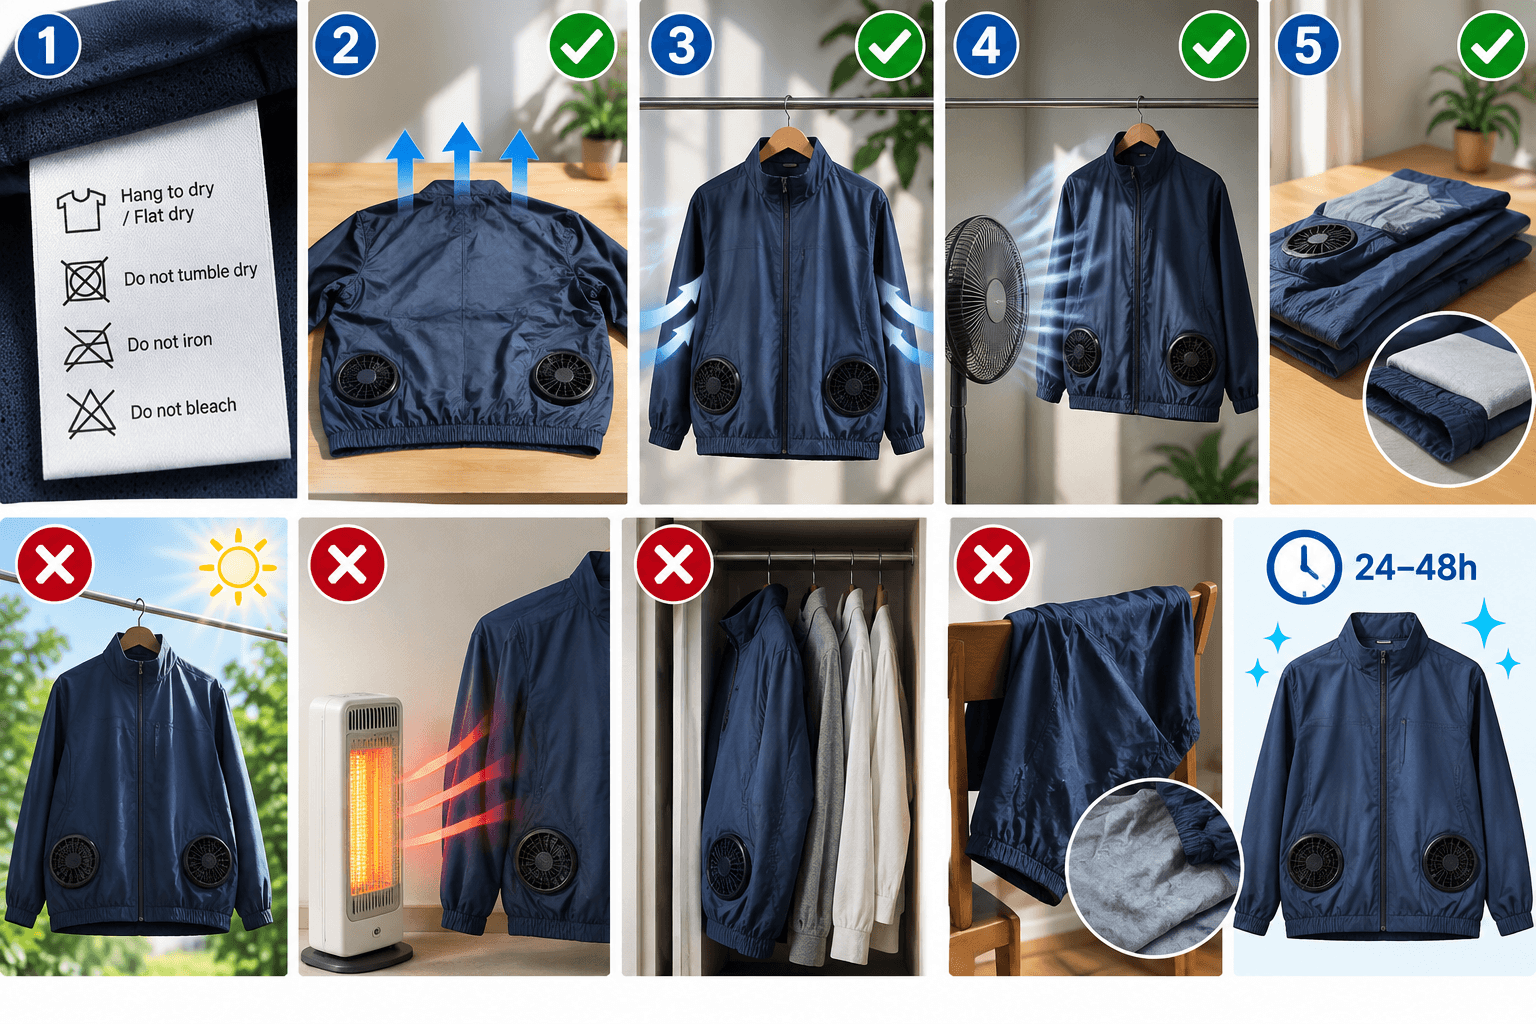
How to air dry it
-
Check the label for flat dry or line dry/hang to dry. They’re not interchangeable.
-
Flat dry prevents gravity from stretching out shape-sensitive panels.
-
Hang dry works fine for fabrics rated for it.
-
Pick a shaded, well-ventilated spot. No direct sun, no space heaters, no leaving it near a vent.
-
Flip flat-dried pieces once so the underside doesn’t stay damp.
Confirming it’s dry
Make sure there’s no cool or damp feel anywhere on the surface or lining. Seams, pockets, and the fan housing area should feel dry. The vest should feel back to its normal dry weight, not heavier in any spot.
Give it a full 24–48 hours before reassembling anything. Rushing this step is how “dry enough” turns into corroded connectors.
Step 5: Stain and Odor Prevention Tips
Sweat stains and lingering odor are the two complaints that push people to search “how to clean cooling fan vest” in the first place. Both are preventable with the right pre-wash habits.
Pre-Treating Sweat Stains
Dab a small amount of mild detergent directly onto sweat-heavy spots like the collar, underarms, and lower back panel, and rub it in gently before the full wash. For stubborn odor that won’t budge, soak the vest in white vinegar for about an hour before washing. The acidity breaks down bacteria without touching the fabric coating the way bleach or abrasive chemicals would.
Wash Temperature Matters
Use the hottest water your fabric label allows, paired with an odor-fighting detergent. This combo lifts bacteria trapped in the fibers better than a cold rinse ever will. Skip the harsh bleach sticks and hydrogen peroxide. They’re built for cotton, not technical cooling fabric.
Timing Prevents Odor Buildup
Clean the vest as soon as possible after heavy sweat use. Don’t let it sit damp in a laundry basket. Aim to wash or fully dry it within 24 hours of wearing. Add an extra rinse cycle if odor was already noticeable before washing. Let the vest air out for a few minutes even after light wear, before storing it away.
Step 6: Storage Guidelines for Long-Term Care
A cooling fan vest that sits crumpled in a gym bag all winter won’t work right come summer. Storage matters just as much as cleaning.
Where to Store It
Pick a dry, cool, well-ventilated spot indoors. A stable room environment works best. Aim for 10–22°C (50–72°F). Skip garages, attics, or anywhere temperatures swing wildly.
How to Store It
Never ball it up, roll it tight, or crimp the fabric. Soft PCM inserts deform under pressure, and cramped folds crush the internal ducts. Lay the vest flat instead. If your model uses removable cooling packs, store those flat too. Storing them on edge creates stress points that lead to shell cracking or leakage.
Battery and Fan Separation
Pull the battery pack and fan module out before tucking the vest away. For cooling vest battery storage, keep the charge between 40–60%, in a cool, dust-protected container, under 60% relative humidity. Skip hot cars and damp spaces. Both accelerate degradation.
Seasonal Off-Period Checklist
Before winter storage: wash it, dry it fully (24–48 hours, well-ventilated area), separate every removable part, then pack it alongside your other summer gear. That way, next season’s setup takes minutes, not a full afternoon of digging through boxes.
Complete Maintenance Checklist
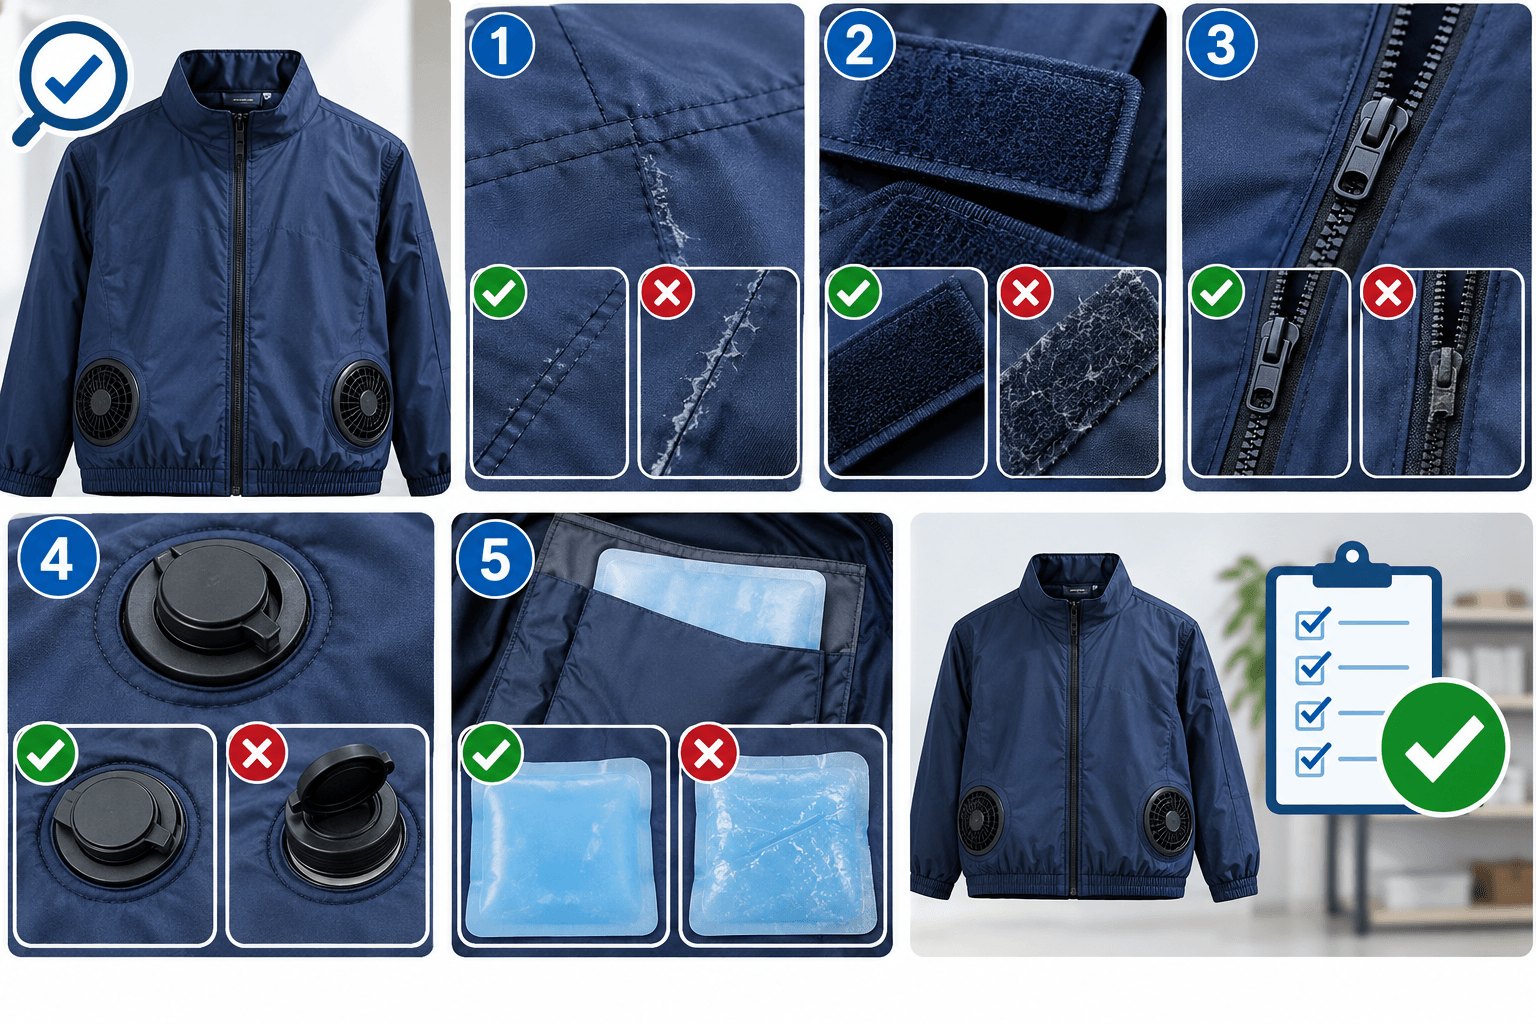
Print this out. Tape it inside your gear closet. A quick scan before every wash catches problems before they turn into a ruined vest.
Before You Wash: Inspection Pass
-
Check seams for cracking, whitening, bubbling, or tackiness
-
Inspect Velcro for lint buildup, worn hooks, or edge peeling
-
Check zippers for misaligned teeth, jammed sliders, or fabric catching
-
Confirm seals, fill caps, and closures shut tight with no visible gap
-
Look over cooling chambers/modules for leaks, cracks, swelling, or abnormal softness
If you find any of these, skip the machine wash entirely until the part gets inspected or replaced.
Prep and Secure
-
Remove PCM packs, gel inserts, weighted pads, and batteries
-
Zip zippers fully closed
-
Press Velcro flat and closed
-
Snap buckles and press studs shut
Loose closures snag fabric and abrade seams mid-cycle.
After Washing
-
Air dry fully in a cool, ventilated space
-
Verify no lingering dampness in seams, pockets, or chambers
-
Wipe cooling modules with a damp cloth only—never submerge
-
Repack components individually before storage
Icebeartech’s seam leak pass rate is 98% or higher. That’s why seam inspection sits at the top of this list.
Troubleshooting Common Issues
A fan that won’t spin, a smell that won’t quit, or fabric that’s fraying at the edges—these three complaints cover 90% of the support tickets any cooling vest brand gets. Here’s how to fix each one without making it worse.
Fan Not Working
Start with the basics. Pull the fan, battery, and cables free of the vest before you inspect anything. Nine times out of ten, the culprit is dust or lint jammed in the intake. Wipe the fan intake and housing with a dry microfiber cloth—no water, no exceptions. If the housing needs more than a wipe, use a soft cloth with mild soap and lukewarm water on the exterior only, then let it air dry in a ventilated spot before reassembling and testing. Reconnecting a damp fan is how a simple dust clog turns into a dead motor.
Persistent Odor
If the smell survives a normal wash, the fix isn’t more detergent—it’s less. Excess soap leaves residue that traps moisture and blocks evaporation, which feeds odor instead of killing it. Switch to a fragrance-free detergent, wash again, and extend drying time in a well-ventilated area. Still smells musty? Add a specialized odor-removal product post-wash, then air dry again. If a machine wash cycle can’t shake it, drop to hand washing with cold water—several care guides call this the safest odor fix for delicate fan ports and wiring zones.
Fabric Damage
Fraying mesh, stretched panels, weakened seams—these show up from aggressive scrubbing, wringing, bleach, or high heat. Once you spot wear, stop machine washing. Switch to cold water, gentle pressing, and a mesh laundry bag with zips closed. One product FAQ pegs a well-maintained washable vest at roughly 25 wash cycles before performance drops—treat every cycle gently and you’ll hit that number.
Frequently Asked Questions
Every support inbox for cooling fan vest brands gets the same five questions on repeat. Here’s the short version.
Can it be machine washed?
Yes, most fan vests handle a machine wash once you’ve pulled the battery and fan module out first. Use a gentle cycle, cold water, and a mesh bag. With Icebeartech’s AC08, you remove the electronics and wash the vest normally.
Can electronics get wet?
No. Never submerge the fan, battery, or charging port. Wipe them down with a damp cloth—never a soak.
Can it be tumble dried?
No. Heat warps the fan housing and damages internal air channels. Air dry only.
How does this compare to an ice vest?
Ice vests skip the electronics risk, but they trade that for cooling-pack management and pre-chill time. Fan vests take more disassembly per wash; ice vests take more prep before wear.
Conclusion
To keep your cooling fan vest in top shape, always remove the fan and battery before washing, hand wash the fabric on a gentle cycle instead of tossing it in the machine, and let it air dry completely before storing it away. Skip any of these steps, and you’re risking a dead fan, a fried battery, or a vest that smells worse after washing than before.
Follow the cooling fan vest washing instructions we’ve outlined here, and you’ll get way more mileage out of your investment—reliable cooling when you need it most, without funky odors or busted electronics. Bookmark this guide, run through the maintenance checklist after every few wears, and you’ll never have to guess whether it’s safe to toss your vest in the wash.