Just unpacked your cooling scarf and found it doesn’t feel as cool as you expected? This doesn’t necessarily mean there’s a problem with the product. For water-activated cooling scarves, proper soaking and activation are the first steps to achieving a cooling effect. If the soaking time is too short, or if you wear it before the internal absorbent material has fully absorbed water, the actual effect will naturally be reduced.
Different materials used in cooling scarves require different activation methods. Ordinary evaporative fabrics usually absorb water quickly, while models containing polymer beads or absorbent crystals require more time for the internal material to fully expand.
This guide will start from the first use, introducing how to properly activate and wear a cooling scarf, including how long to soak, how to squeeze out excess water, how to reactivate it after the cooling effect weakens, and some details that are easily overlooked in daily use.
Mastering these methods will allow you to fully utilize the evaporative cooling effect of your cooling scarf and reduce the “why isn’t my cooling scarf cooling me?” questions caused by incorrect use.
What You’ll Need Before Activating Your Cooling Scarf
Gather your supplies before you start. This takes two minutes and saves you from a soggy mess halfway through.
You’ll need cool or cold tap water (skip the ice water, despite what you’d assume). Grab a sink or bowl big enough to fully submerge the scarf. And have clean hands or a towel ready for wringing out excess moisture.
If you’re working with a crystal beads activation style cooling scarf, budget more time. Those polymer beads need several hours to fully expand and absorb water. Evaporative fabric versions activate in under a minute.
Quick prep checklist:
– Cool tap water (not icy)
– Sink, bowl, or bucket
– Towel or hands for wringing
– Refrigerator access (optional, for extra chill)
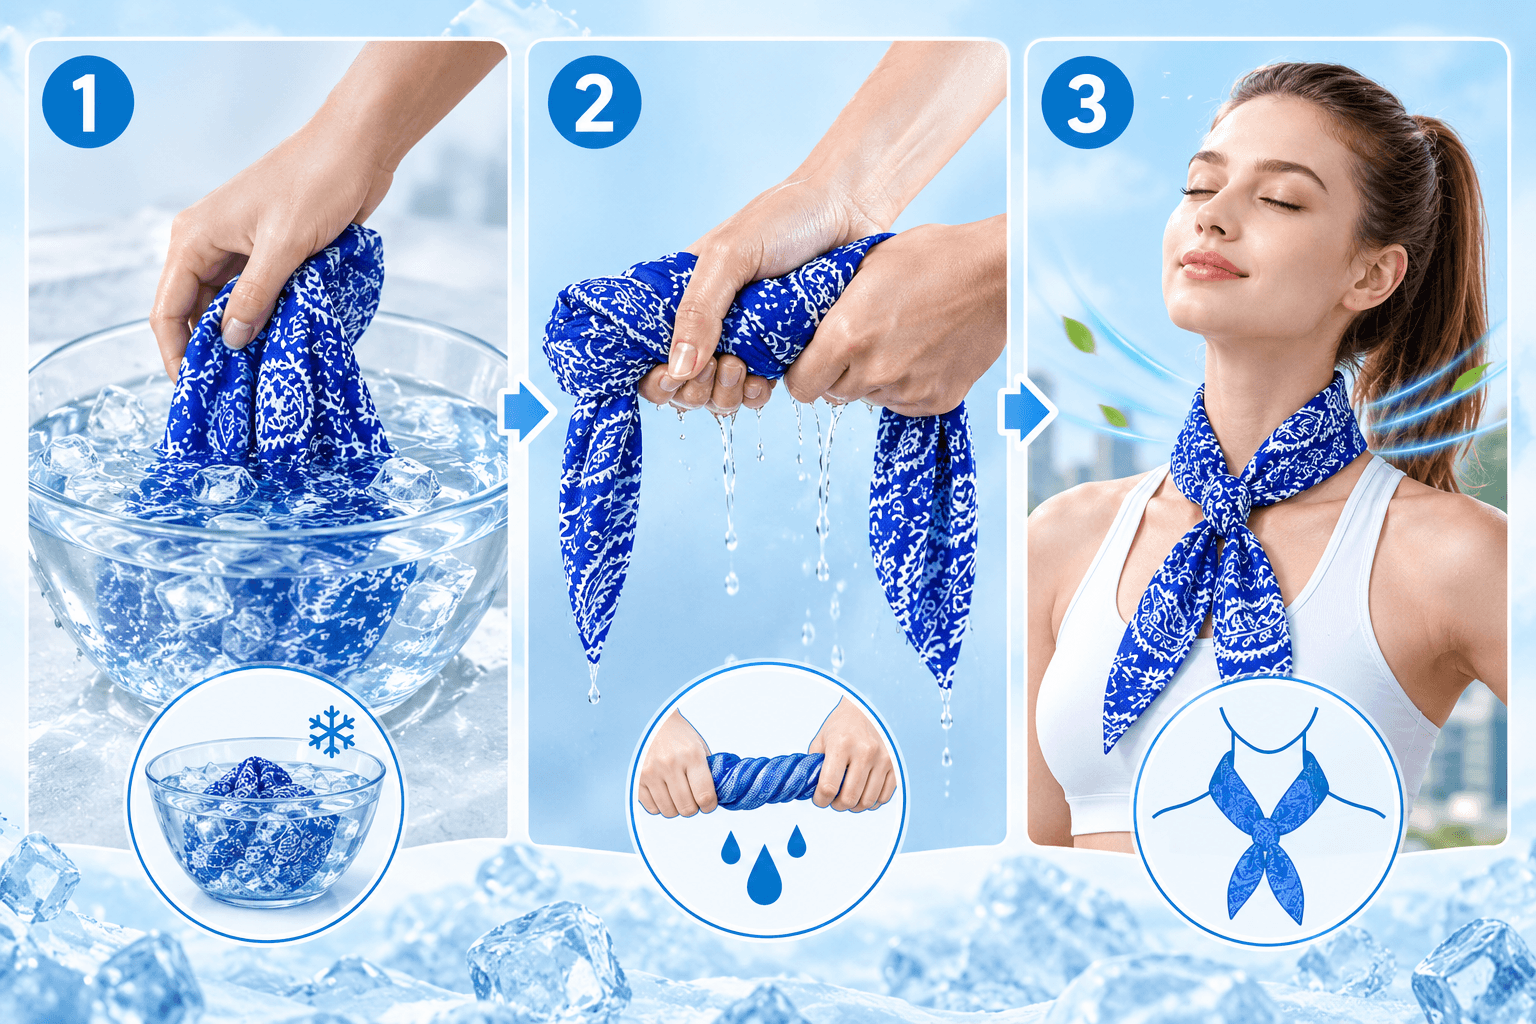
Step 1: Soak the Cooling Scarf in Cold Water
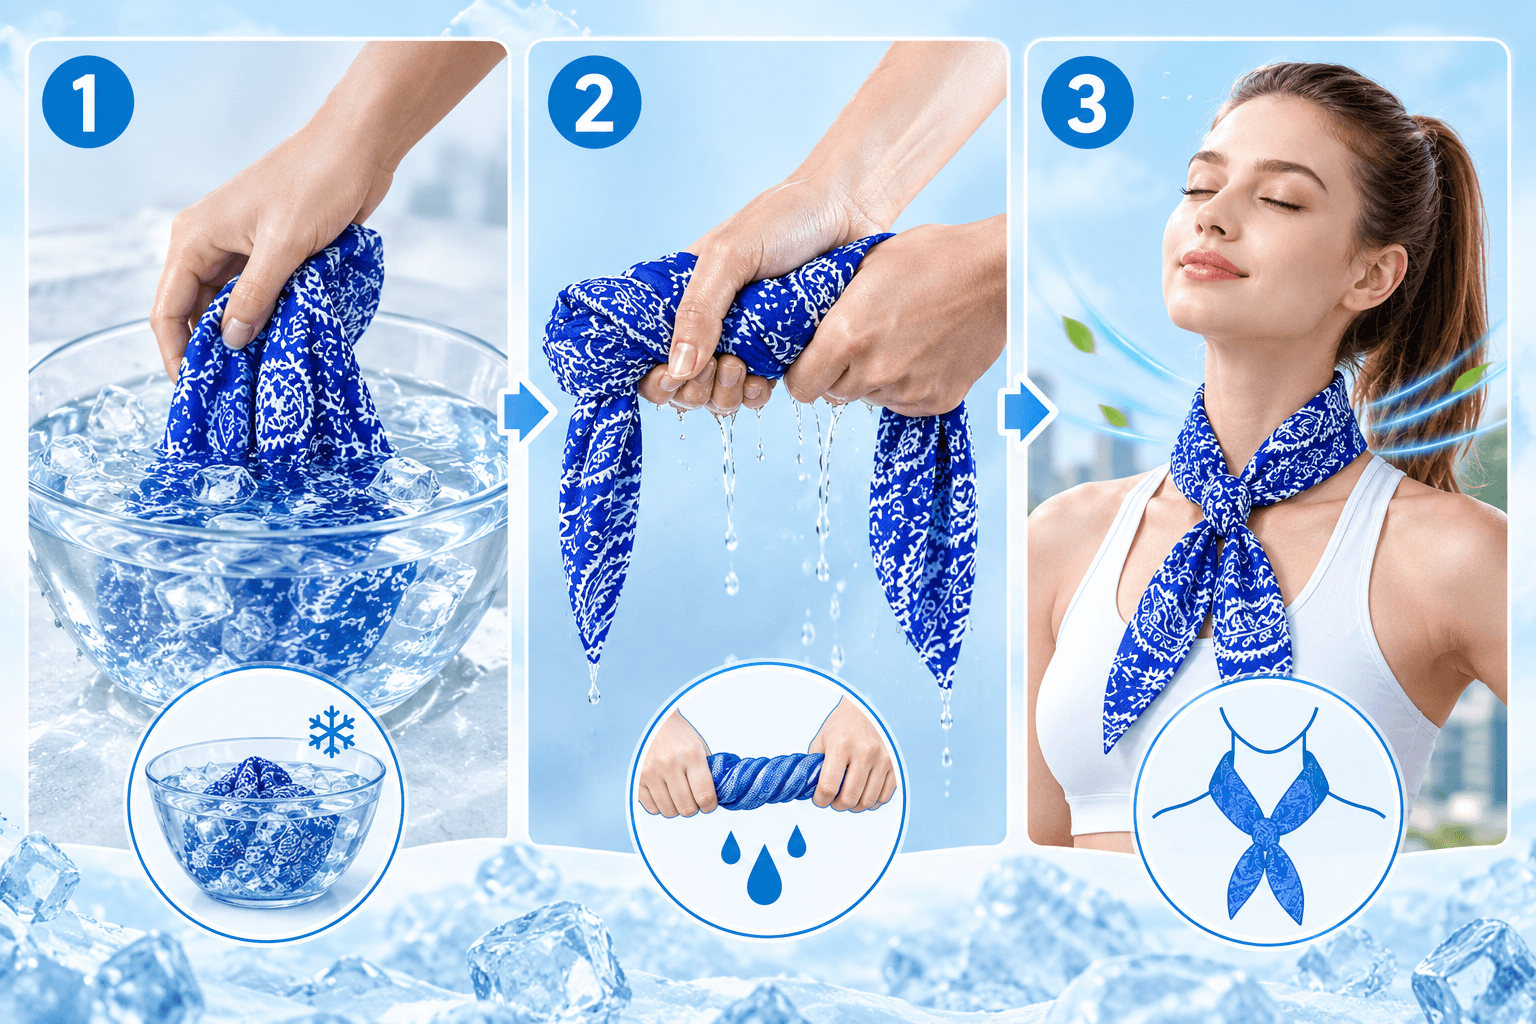
Timing here isn’t one-size-fits-all. It depends on what’s inside your scarf.
Thin evaporative or microfiber styles activate fast; 30 to 60 seconds submerged in cold water is usually enough. Pull it out, and it should feel damp, not soggy.
Crystal beads and polymer-based scarves need more patience. These typically require 3 to 5 minutes for full absorption, though some manufacturers recommend 15 to 25 minutes, or even 15 to 30 minutes, to let the beads fully expand. Thicker scarves or first-time activations can stretch to 20 minutes or longer—occasionally a few hours for dense, DIY-style designs.
Here’s what’s happening: most cooling scarves use super-absorbent polymer crystals or polyacrylamide granules. Once submerged, these tiny beads swell dramatically—up to 400 times their original size—soaking up water and forming a gel-like structure inside the fabric. That gel slowly releases moisture to the surface, and evaporation does the cooling work. This is why proper soak time matters.
During soaking:
– Fully submerge the scarf
– Gently move or massage it while soaking, especially for bead-filled styles
– This prevents clumping and uneven hydration, where one section soaks up water while another stays dry
How to know you’ve soaked long enough:
– Beads or crystals feel plump and soft, not hard or lumpy
– The scarf feels fully saturated but isn’t dripping when lifted out
– If it’s still stiff in the center, give it more time in the water
Step 2: Wring Out Excess Water the Right Way
Squeeze, don’t twist. That’s the entire principle behind this step, and getting it wrong is the fastest way to sabotage your cooling scarf’s performance before you’ve even worn it.
Once your scarf is fully soaked, pull it out of the water and use both hands to press and squeeze out the excess moisture. Don’t wring it like a dish towel. Twisting the fabric puts stress on the crystal beads and fibers, and can damage the internal structure that’s supposed to hold water and release it slowly.
The right technique:
– Cup the scarf in both hands and squeeze firmly, working from one end to the other
– For bead-filled or thicker scarves, wrap it in a dry towel first, then press to transfer excess water into the towel
– Give it a few short shakes or snaps afterward, this helps release surface water without over-drying the material
What “properly wrung” feels like:
Your scarf should feel damp, not dripping. If water runs off the second you lift it, you haven’t squeezed enough. If it feels stiff, dry, or the fabric looks wrinkled and pulled, you’ve gone too far.
This damp-not-soaked state matters for cooling scarf technology specifically. Too much surface water dilutes the cooling effect and makes the scarf feel clammy instead of refreshing against your neck.
Step 3: Wear It Correctly for Maximum Cooling Effect

Position matters more than most people realize. Wrap the scarf around your neck first; that’s where the most blood vessels sit close to the skin, so it’s the fastest route to actual cooling. If you’re outside in direct sun, fold it into a headband instead, 3 to 4 inches wide, and cover your forehead, temples, and hairline. For yard work, hiking, or job sites where you’re bent over or wearing a helmet, drape it across your shoulders and back of the neck instead.
Fit and airflow rules:
– Keep it snug against skin, not tight. Tight cuts off airflow and traps heat instead of releasing it
– Never layer clothing or gear over it. The cooling scarf needs open air to evaporate moisture and stay cold
– Position it where air moves naturally, like the sides of your neck or over your collarbone
Timing your wear:
Most people soak it 1 to 5 minutes, wring it to damp, then put it on immediately. If you want a stronger initial chill, refrigerate it for 30 minutes first. Some brands suggest freezing 90 minutes to 2 hours for max cold, though overdoing it can stress the fabric.
Once the cooling fades, usually within 15 to 30 minutes during heavy activity, soak it again or mist it to recharge.
The activation method for PCM Neck Cooler is different from this one. Click here to see the activation methods for different products.
How Does a Cooling Scarf Work? The Science Behind It

Cooling scarf technology is basic physics wearing a marketing costume.
It works through evaporative cooling and polymer crystal absorption. When you soak the scarf, those tiny crystal beads swell and trap water inside their structure. Once exposed to air, that stored water evaporates from the fabric surface. Evaporation pulls heat away from your skin as it happens, and that heat transfer creates the chill you feel.
Water stored in polymer crystals evaporates into the air, extracting heat from your skin. The cooling sensation that results depends entirely on humidity and airflow.
The neck sits close to your carotid arteries. Cooling that area helps lower your perceived body temperature faster than almost anywhere else you could wrap the fabric.
What the Data Actually Shows
Commercial product sheets report temperature drops of 6 to 12°C, lasting 5 to 10 hours depending on conditions. Some brands claim skin temperature reductions of up to 6 to 10°C below ambient air. Others push benchmarks as high as 15°C below ambient temperature, though that number swings hard based on humidity, sun exposure, and airflow.
A few dense textile designs claim cooling effects lasting 24 to 72 hours before you need to rehydrate. That’s the outlier.
Some cooling scarves carry professional-grade or military-spec ratings, built for genuine heat management in intense environments.
Common Mistakes When Activating a Cooling Scarf
Many people feel that their cooling scarf’s “cooling effect is not obvious.” The problem may not necessarily be with the product itself, but rather that the absorbent material wasn’t fully activated during the first activation. This is especially true for products containing polymer beads or absorbent crystals; soaking time and application methods will affect the actual effect.
Insufficient Soaking Time
This is the most common problem. A wet surface doesn’t mean the absorbent material inside is fully activated. Different structures require different soaking times; some only need a few minutes, while some polymer bead cooling scarves may require longer.
Therefore, instead of judging by feel, follow the product instructions for the recommended soaking time. Especially for first-time use, don’t rush to remove it.
Inappropriate Water Temperature
There’s no need to use extremely cold water for a stronger cooling effect. The core of a cooling scarf is to allow the internal material to fully absorb water, then let the water evaporate to remove heat. Normal cold water or tap water is usually sufficient for activation.
Wringing Out Excess Water Forcefully
After soaking, simply squeeze out the excess water, keeping the scarf damp but not dripping wet.
Repeatedly twisting the cooling scarf like wringing out a towel can increase the burden on the internal materials, seams, and fabric. Long-term use of this method may also shorten the product’s lifespan.
Not fully submerged in water
If only part of the scarf is submerged, the absorbent material may swell on one side while remaining dry on the other. When soaking, ensure the entire cooling scarf is in contact with water and adjust its position appropriately for more even absorption.
Before wearing it, perform a quick check with your hand. If the internal material has absorbed water and swelled evenly, you can squeeze out excess water and begin use.
In short, proper activation is not complicated: fully soak, evenly absorb water, gently squeeze out excess water, and then wear it. Following these steps often yields a more effective cooling effect than simply using ice-cold water.
How to Reactivate and Maintain a Cooling Scarf
Cooling scarves are generally reusable. As moisture evaporates, the cooling effect will gradually weaken. This doesn’t mean the product is ineffective; simply reabsorb water to regain its evaporative cooling effect.
How to Reactivate After the Cooling Effect Diminishes?
The reactivation method is basically the same as the first use. Thoroughly soak the cooling scarf in cold water. Once the fabric or internal absorbent material has reabsorbed enough moisture, remove it and gently squeeze out the excess water, keeping it moist but not dripping. It’s ready to wear again.
For regular cooling towels or PVA products, reabsorption is usually quick; however, for cooling scarves containing polymer beads or absorbent crystals, it may take longer. Therefore, it’s best to refer to the product instructions for specific soaking times.
For outdoor activities or working in high temperatures, it’s not necessary to wait for the scarf to dry completely before reactivating it. When the cooling effect has noticeably weakened and the fabric begins to dry, you can soak it again for a more continuous cooling experience.
Do not store away immediately after use.
If you sweat a lot, rinse with water and clean with a mild detergent if necessary. Different materials have different requirements for machine washing, water temperature, and cleaning methods, so it is recommended to check the care label before washing, especially for products made of special materials such as PVA and Polymer Beads.
After washing, let it air dry naturally in a well-ventilated area, avoiding prolonged exposure to direct sunlight or high-temperature drying. Store it only after it is completely dry to reduce odor and mold problems.
Some cooling scares may harden after drying, which does not necessarily mean the product is damaged. After soaking it in water again according to the instructions, the material will usually gradually regain its softness.
In short, daily maintenance only requires remembering: replenish moisture promptly, wash gently, dry thoroughly, and store according to the specific material’s instructions. This will allow the cooling scare to maintain good usability after multiple cycles of absorbing water and drying.
Frequently Asked Questions About Cooling Scarf Activation
Real questions come up after the scarf’s already around your neck, not before. Here’s what people actually ask once they’re standing there, damp fabric in hand, wondering if they did it right.
Why isn’t my cooling scarf cooling?
Nine times out of ten, it’s one of three things: not enough soak time, wrung too dry, or the material’s already dried out from a previous use. Run through the checklist again: full submersion, even soaking, wring to damp-not-dripping. If you’ve got a PVA-style scarf, check the color. It should look noticeably darker once it’s absorbed enough water. If it’s still pale, it’s not activated yet.
Can you freeze a cooling scarf?
Some can handle a quick trip to the fridge for extra chill. But freezing isn’t the standard activation method for most brands, and it’s not universal. Check your product’s instructions before assuming yours can take it. Some materials only tolerate cold, clean water, nothing colder.
How long does a cooling scarf last?
This varies more than you’d expect. Evaporative and polymer styles typically run 1.5 to 3 hours. Crystal bead versions can stretch to 4 to 6 hours. A handful of brands claim up to 20 hours, though that depends heavily on humidity, wind, and temperature. Expect somewhere between 1 and 6 hours as a realistic average.
What’s the best water temperature for activation?
Cold or cool tap water works fine. Ice water isn’t required, despite what you might assume. Some products even activate at any water temperature, as long as it’s clean and there’s enough of it.
Can a cooling scarf activate without water?
No. Water-activated cooling scarves rely entirely on evaporation or moisture-retention to work.
Quick Reference for Cooling Scarf Activation
-
Soak: 1–3 minutes in cool water
-
Wring: until moist, not dripping
-
Snap: a few sharp snaps kickstart evaporation
-
Wear: straight onto your neck
-
Rewet: repeat the cycle once it dries out
Avoid freezing evaporative scarves (that’s for gel/PCM packs), over-soaking until dripping, and storing damp scarves in sealed bags. Air-dry first to dodge mildew.
Conclusion
Properly activating a cooling scarf is not complicated. Thoroughly soak it according to the product instructions, and once the fabric or internal absorbent material is fully soaked, gently squeeze out excess water. Then wear it close to your neck, and the evaporation of moisture will begin to carry away heat.
What truly affects the user experience is not just the initial activation, but also proper rehydration, cleaning, and storage afterward. Re-soaking it promptly when the cooling effect diminishes, thoroughly drying it after use, and choosing the appropriate washing method based on the specific material will allow the cooling scarf to be reused repeatedly throughout the summer.
If you are still comparing different types of cooling scarves, or want to learn more about different cooling technologies such as PVA, Polymer Bead, and PCM Neck Cooler, you can visit the ICEBEARTECH website for more products and usage guides.
For brand owners, distributors, promotional item buyers, and industrial supplies customers, ICEBEAR TECH also offers OEM/ODM services for its Cooling Scarf, Cooling Towel, Cooling Neck Wrap, and PCM Neck Cooler product lines. Custom colors, sizes, fabrics, logos, and packaging can be tailored to project requirements.
Whether you’re looking for a Cooling Scarf for everyday use or seeking bulk purchasing and customization solutions for your brand, you can learn more about our products through the ICEBEARTECH website and contact us for product catalogs, samples, and OEM/ODM quotes.