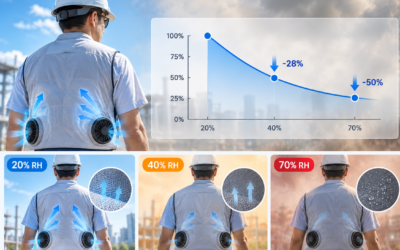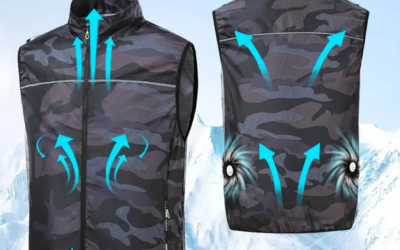
Just unboxed your battery-powered fan vest? You’re staring at straps, a controller, and a battery pack, wondering where to start. Maybe you’ve had it for a few weeks but aren’t sure if you’re charging it right, or that third fan speed setting seems to do nothing. A cooling vest with fans is simple once you know the setup, but small details like battery placement or which button controls speed versus power trip up more people than you’d expect. This guide walks through using your fan vest from first charge to all-day wear, covering the charging routine, speed controls, fit adjustments, and what to do when something isn’t working right.
Unboxing and Component Guide: Battery Powered Fan Vest Parts Explained
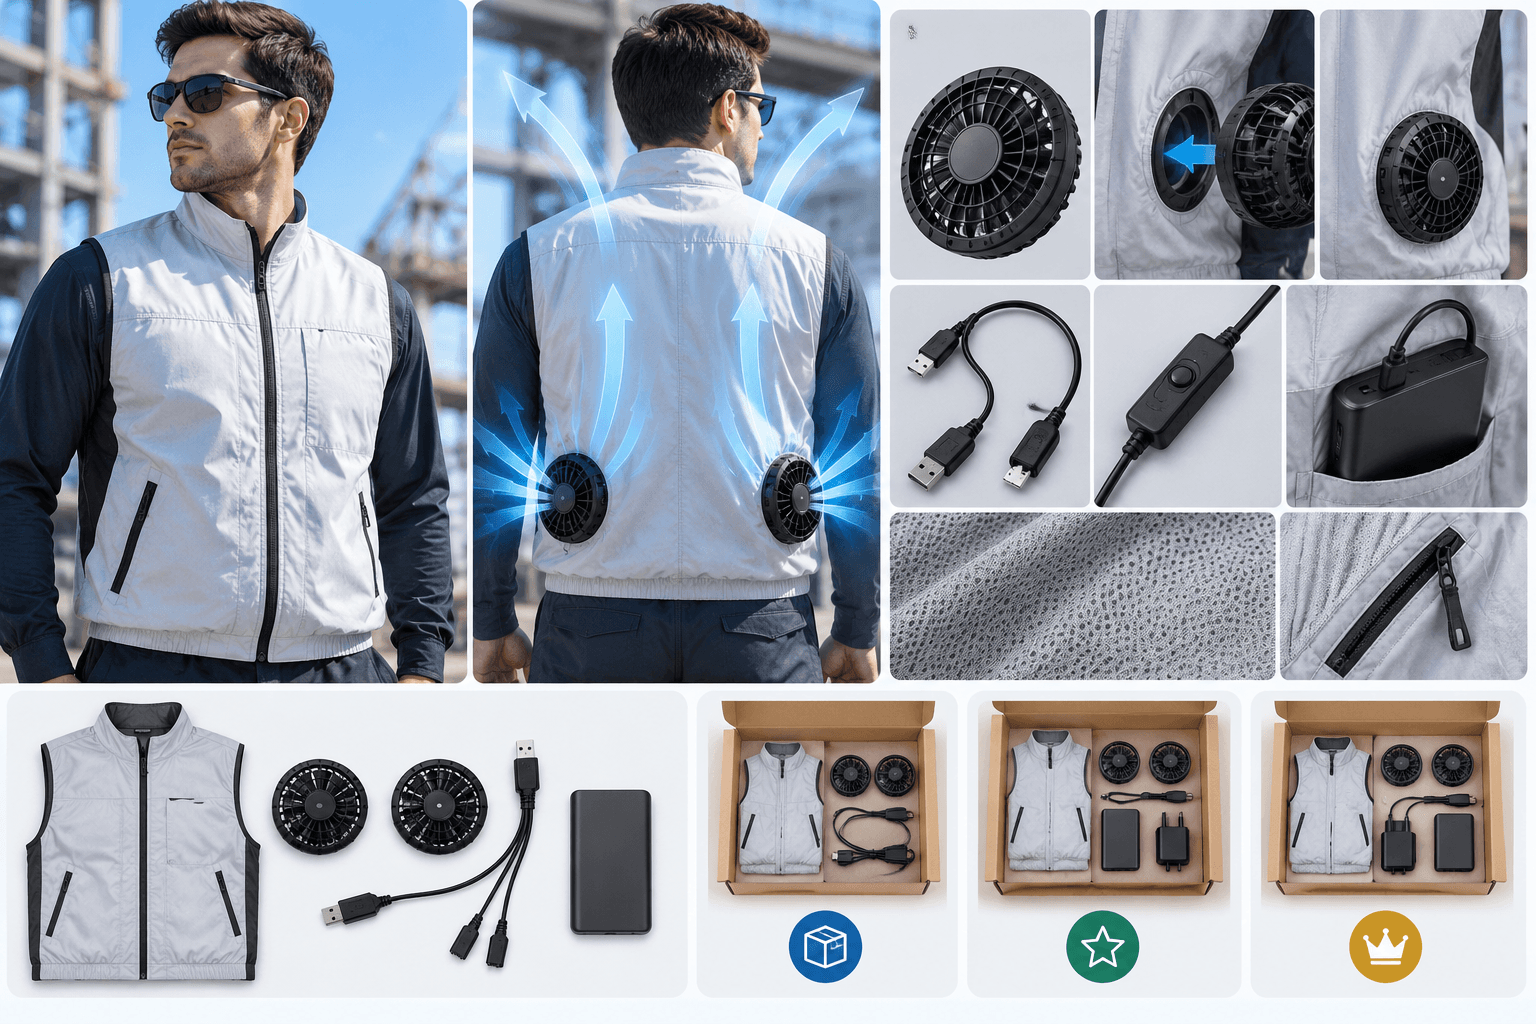
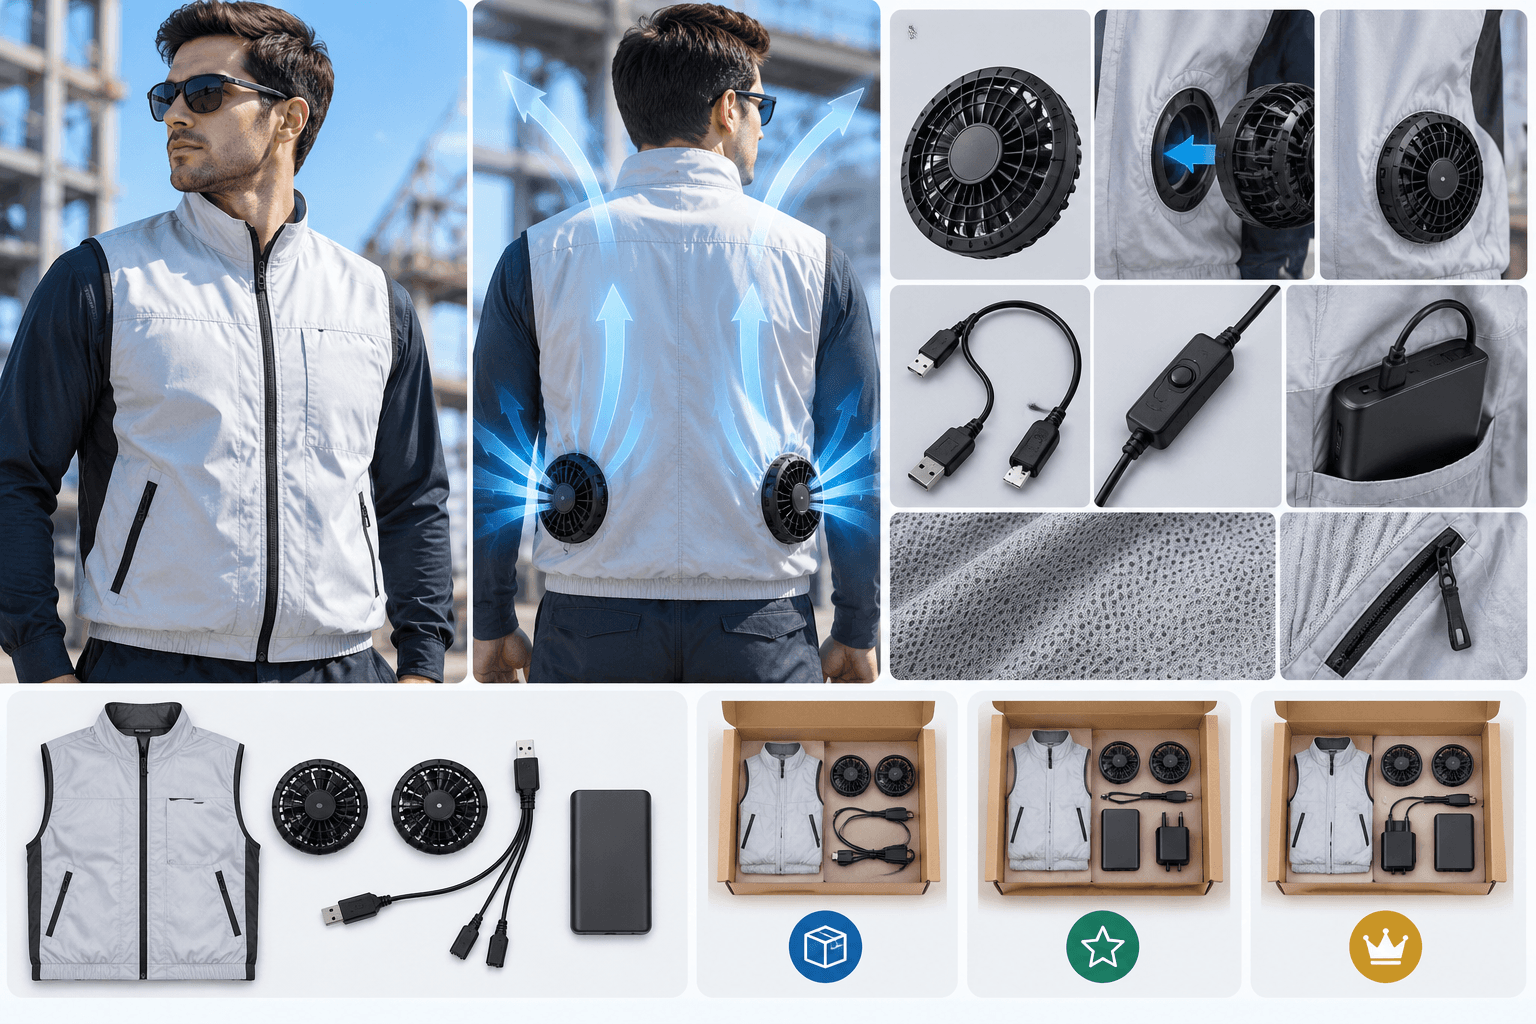
Every fan vest ships with the same core parts, though the exact bundle varies by seller. Standard packaging includes the vest body, two fans, one connector cable, and depending on the version, a battery pack. Budget models skip the battery entirely, expecting you to supply a 5V power bank instead.
You’ll find three common package configurations. The basic kit gives you the vest, two fans, and one cable but no battery—you bring your own power bank. The full kit adds a battery and charger. Premium versions come with dual speed-control cables.
The vest body is lightweight mesh or hi-vis fabric, common in workwear cooling vest styles, with two circular fan openings on the back. The fan units are small, detachable, round fans that snap into those back openings to create airflow. The connector cable is usually USB or dual-headed, sometimes with a built-in switch or speed dial. The battery pack is either a USB power bank or a dedicated rechargeable battery vest system, often stored in a side pocket or external pouch.
Look for two round holes on the back; those are the fan slots. A USB or split cable connects fans to power. That’s your whole system.
Installation Steps: How to Properly Connect the Fan, Controller, and Battery
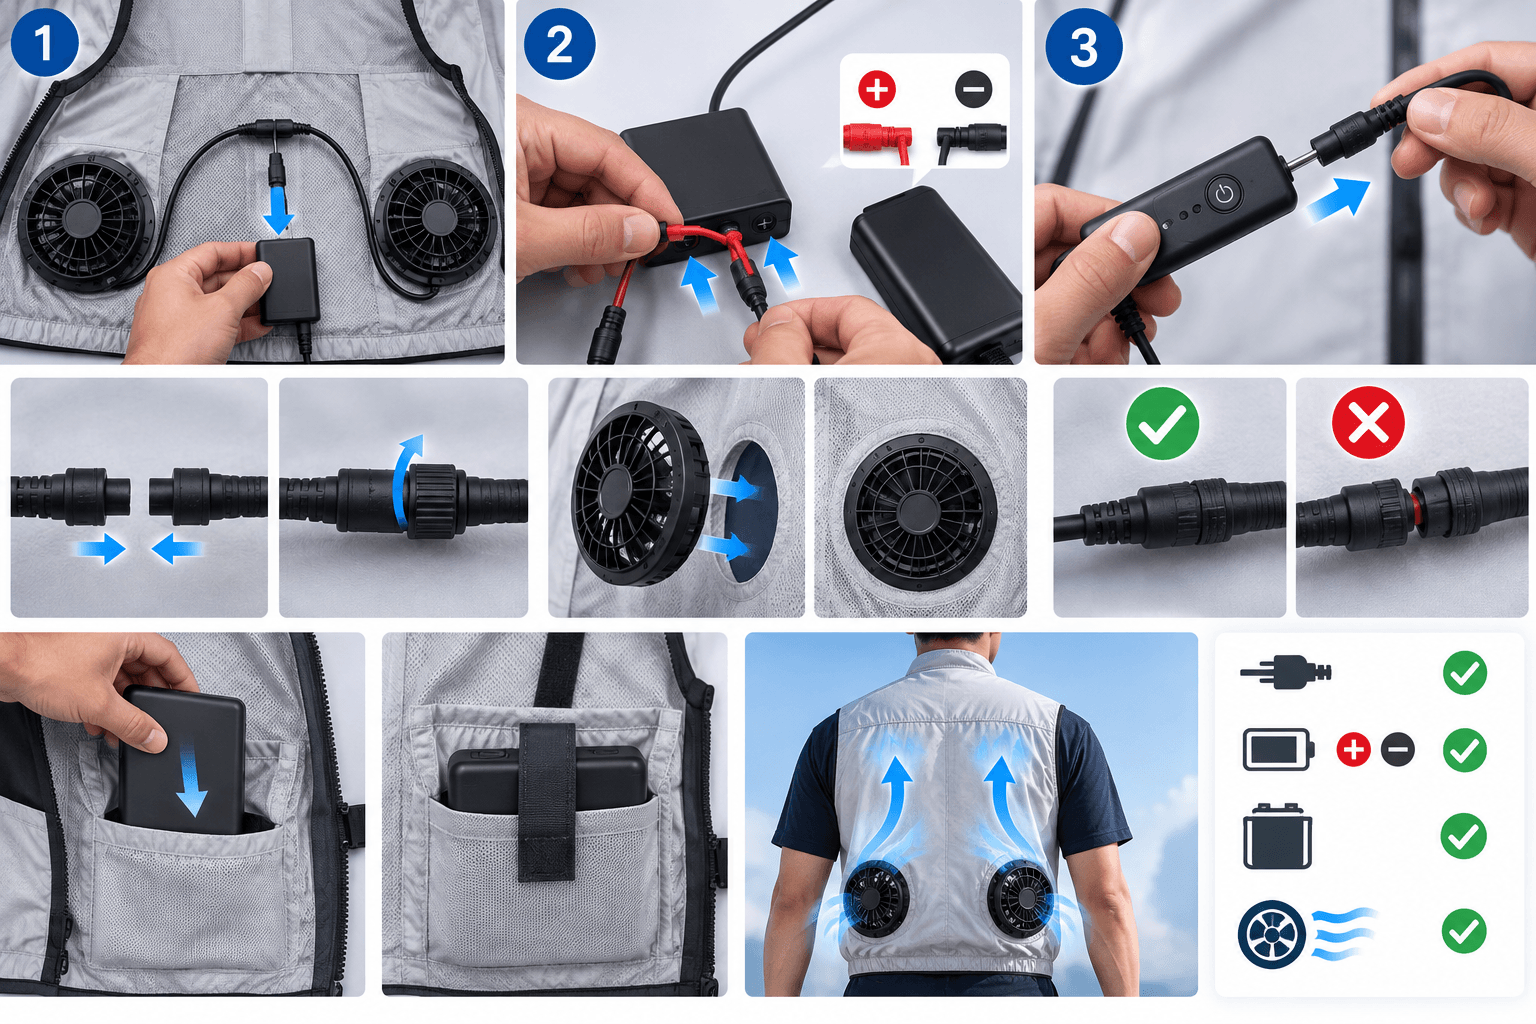
Connection order matters. Get it backward, and you risk a spark or a fried controller.
Follow this sequence every time:
-
Plug the internal wire harness from the vest into the controller’s main port first.
-
Connect the controller’s power input line to the battery terminals—red to positive, black to negative. Never guess based on color alone; check the terminal labels.
-
Pair or plug in the remote/switch last.
This “fan first, battery last” order keeps you from making live connections by accident.
Getting the plug fully seated is where most fan vest problems start. Line up the connector with its anti-mistake notch and push until it stops. If your model uses a rotating lock-style connector, position it inside the fabric against the fan base, then turn clockwise until the triangle mark aligns with “II.” That’s locked.
A properly connected system has the plug fully inserted, the lock engaged, and no cable slack. Flickering fans, intermittent power loss, or shaking on startup almost always trace back to a connector that isn’t fully seated or a terminal that’s loose.
Securing the Battery Pack
Don’t let the battery dangle loose outside the vest. Slide it into the dedicated waist pouch, then loop the strap through the fastening hole to lock it in place, similar to how Makita-style portable fan systems secure their battery mounts. The triple-point setup (internal pouch strap, belt clip, hole-threaded strap) keeps the battery from shifting during movement, which is the #1 cause of mid-shift power drops in outdoor cooling vest use.
Quick Installation Checklist
-
Connector fully inserted and locked
-
Red-to-positive, black-to-negative confirmed
-
Battery secured in pouch and strapped
-
Test run shows steady, flicker-free airflow
Before First Use: The Complete Guide to Fan Vest Battery Charging Instructions
Skip the full charge on day one, and you’re setting yourself up for disappointment. Most rechargeable battery vest units ship from the factory at half power—enough to test the fans, not enough to protect long-term battery health. Manufacturers across the industry all tell you to fully charge the battery before first use.
Charging time varies by battery capacity. Expect one of these windows:
-
2 hours for smaller-capacity batteries
-
3–4 hours for standard fan vest battery life packs (the most common spec)
-
4–6 hours for higher-capacity or heated-garment-style batteries
Check your specific manual. If it states a longer window, trust that number over general estimates.
Reading the Charge Indicator
Your charger’s LED tells you everything. Red light on means charging. Green light on, or red light off, means fully charged and ready to disconnect. Some models use four LED dots instead. All four lit means 100%.
Choosing a Power Source
The original charger and cable are your safest bet every time. If you’re using a USB power bank instead, confirm it outputs 5V DC, 5V/2.4A or lower. More power isn’t better here. Overpowered chargers can stress smaller battery cells.
Press the Power Button First
Before connecting your fan vest, press the power button on the battery itself. Skip this, and you’ll swear the unit is dead when it’s asleep. This single step resolves more “my fan vest won’t turn on” complaints than any other fix.
Power On and Speed Adjustment: A Guide to Switching Between the Three Fan Speeds
Power button, held for two seconds. That’s the entire startup sequence for most fan vest models. Let go too soon and nothing happens. Hold it a beat longer than feels natural, and you’ll see the indicator light come on, confirming the unit is live and usually defaulting to low speed.
Speed control works the same way across nearly every fan jacket for hot weather on the market. One short press cycles through the speeds. The sequence runs Low → Medium → High → back to Low. Some vests mark each level with a distinct LED color (white, blue, and green are common), so you can glance down and know your setting without guessing.
Match the speed to the situation:
-
Low: indoor work, light movement, when battery life matters more than airflow
-
Medium: commuting, general outdoor walking, the everyday balance point
-
High: direct sun, high heat, short bursts when you need cooling fast
Higher speeds move more air through the vest, which speeds up sweat evaporation and pulls heat off your skin faster. That’s the mechanism. The tradeoff is battery drain. Crank it to High for hours and you’ll cut your runtime noticeably. To power off, hold the same button for two seconds again; the light shuts off with it.
Wearing and Adjustment Tips: How to Get the Best Performance from a Cooling Fan Vest
Fit makes or breaks airflow. A cooling vest with fans only works when the air channel stays open, and that comes down to what you wear underneath and how tight you go.
Start with the right base layer. Skip thick cotton. Wear something thin, moisture-wicking, quick-dry underneath. The fan vest goes over that base layer but under your outer workwear or PPE. That layering order keeps sweat off your skin and keeps airflow steady.
Smooth It Out Before You Tighten Anything
Center the vest on your torso first. Then flatten the front, back, and side panels. Check the shoulders, chest sides, and hem specifically. Any wrinkle or fold in those spots crushes the air channel and cuts airflow fast.
Getting the Tightness Right
The goal is snug but not compressed. The vest should stay put when you move, but there needs to be a small air layer left behind the fans. Squeeze that flat and you lose cooling.
Shoulder straps: Adjust until the vest doesn’t slide down or dig into your shoulders. Test by raising your arms and bending over. Restricted movement or underarm rubbing means too tight. A shifting shoulder line means too loose.
Side/waist straps: Tighten enough to hold the fans against your back, but leave roughly a finger’s width of room when you bend, reach, or breathe deep. That’s the standard for a portable fan vest used in warehouse, construction, or inspection work.
Adjust for Your Body Type
For a leaner build, the vest tends to shake loose. Tighten the side straps and hem first; size down if needed. For a standard build, aim for stable shoulders, a centered torso, and flat front and back panels. For a broader or muscular build, size up first, then cinch with straps. Avoid compressing your chest or shoulder blades.
Match Fit to Work Intensity
For light walking or patrol, a slightly looser fit works for comfort during long shifts. For moderate lifting or assembly, a snugger fit prevents shifting when bending or reaching. For heavy labor, test in 2–3 hour blocks first. Higher intensity means you need the fans locked against your back, no sagging.
Wearing Order, Step by Step
-
Thin, quick-dry base layer
-
Fan vest, centered
-
Smooth wrinkles, tighten side straps
-
Outer workwear/PPE on top
-
Power on, then test with arm raises, bends, and squats
Quick Field Check
Turn the fans on. You should feel steady airflow on your back, not pressed flat against skin, not shifting side to side. Outer layer puffing while the inner channel feels flat means too tight. Weak, scattered airflow means too loose. Dial it in until it’s neither.
Safety Usage Guide: Key Reminders to Avoid Damage and Risks
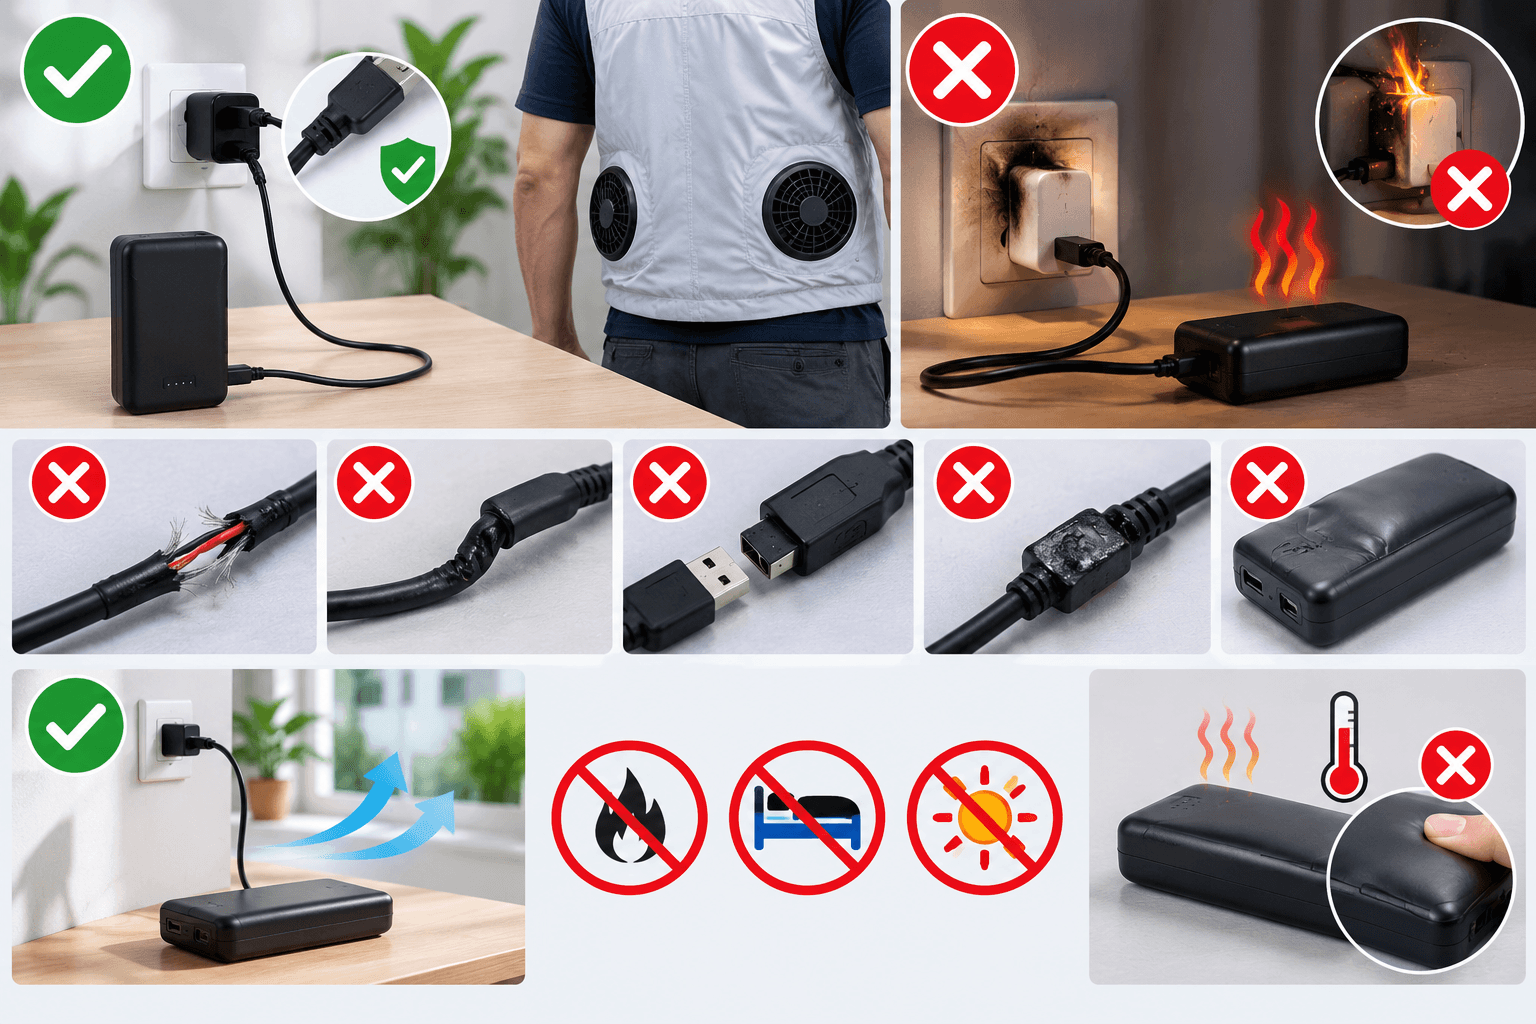
Battery fires from cheap chargers make headlines every year, and fan vests aren’t immune to that risk. The single biggest safety rule for your rechargeable battery vest: stick to the charger and cable that came in the box, or a manufacturer-approved replacement. Third-party chargers don’t know your battery’s power limits. They can push too much current, and that’s how you get overheating, sparking, or worse.
Buy from legitimate sources only. Cheap knockoff chargers sold through random third-party sellers often skip basic safety testing. That’s not worth the few dollars saved.
Inspect Cables Before Every Charge
Stop using a cable the moment you spot:
-
Cracks, splits, or peeling in the outer coating
-
A crushed or bent section
-
A loose or wiggly connector
-
Heat, a burning smell, smoke, or scorch marks
-
Any bulging or swelling
Never patch a damaged cable with tape. A frayed or cracked cable is a live hazard, not a DIY fix. Replace it.
While Charging
Charge the battery in a well-ventilated spot, away from flammable material, and never under a blanket or pillow. If you notice unusual heat, swelling, or odor mid-charge, unplug immediately.
Common Troubleshooting: What to Do When Your Fan Vest Won’t Turn On
Dead-on-arrival usually isn’t dead. Nine times out of ten, a fan vest that won’t power on has a simple fix hiding in the connection chain. Work through this checklist before you assume the worst.
Run through this sequence:
-
Confirm full charge. Check the battery is charged and properly connected to the vest’s power line.
-
Press and hold the power button for 2–5 seconds. A quick tap doesn’t register. You need real hold time.
-
Test with a wall charger. Plug the vest directly into an outlet using a charger rated 5V/2A or higher. This rules out a weak power bank.
-
Reseat every connector. Unplug the battery line, the vest’s main line, and the control cable. Push each one back in until you feel or hear a click.
-
Cycle through fan speeds. Weak airflow doesn’t always mean a dead fan—sometimes it’s just set to Low.
-
Disconnect the battery for 60 seconds, then reconnect and hold the power button again.
-
Swap in a spare battery if you have one. If the vest powers on with a different battery, your original pack or its protection switch is the problem, not the vest itself.
“It Looks Dead But Isn’t”
Some rechargeable battery vest systems ship with the battery in sleep mode. It needs its own power button pressed before it’ll accept a connection. Skipping this step is the most common reason people think their fan vest arrived broken when it’s just asleep.
Best Use-Case Recommendations: Who and When Should Use a Battery Powered Fan Vest
Construction crews, road maintenance teams, and warehouse loaders are the core users of this gear—and for good reason. In tests on Chinese construction workers, WBGT levels between 29 and 33°C marked the exact heat-stress zone where a battery powered fan vest pays off. If you’re outside all shift without time for ice packs or water dips, active airflow beats passive cooling every time.
Best-fit occupations:
-
Construction, roofing, and scaffolding crews
-
Road/landscape maintenance and warehouse logistics
-
Delivery riders, outdoor sales, event setup staff
-
Security patrol and site inspection roles
The sweet spot is below 95°F (35°C)—hot but not extreme, where moving air still outperforms body temperature. Enclosed spaces like basements or concrete interiors with equipment heat sources also work, especially when you’re still mobile.
Conclusion
Mastering your battery powered fan vest comes down to three things: charging it fully before first use, learning the three-speed rhythm that matches your activity level, and giving it a quick wipe-down after tough jobs to keep the fans running smoothly for seasons to come. Get those basics right, and you’ve got a reliable cooling companion for scorching job sites, weekend hikes, yard work, or any day the heat index feels personal.
If your fan vest still won’t power on after troubleshooting, don’t wrestle with it alone. Reach out to our support team at icebeartech.com, or browse our full lineup of cooling vest with fans options built for exactly this kind of heat.